Jumat, 27 April 2012

Cookie: backup and restore your unlock activation ticket right from your iPhone


We’ve shown you how to manually backup your iPhone’s unlock
activation ticket.
And then a new version of Red Sn0w came out that made the process even easier. Well now, thanks to a new jailbreak utility, you can do it right from your iPhone.
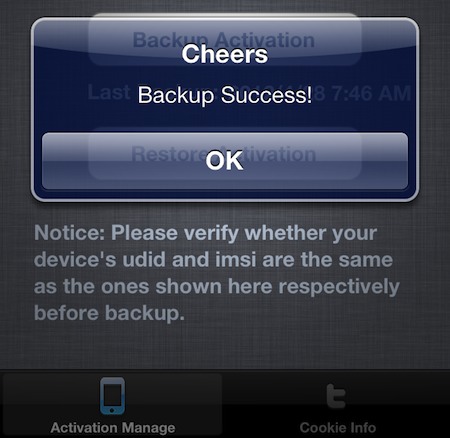
Folks using the new SAM method to unlock their handsets have been directed to backup their activation tickets to make unlocking a possibility in the future. And now with Cookie, the task is as easy as opening an app and tapping a button…
The developer explains:
“Cookie can Backup your iPhone Activation Tickets to Cloud, and once you back it up, you can Restore it to your iPhone ANY TIME! Ticket data is stored on weiphone servers. Use this if you have Activation Tickets gotten by SAM trick, do it before it’s too late.”
That’s right, you can even restore your activation ticket right from your iPhone. I haven’t had a need to restore just yet, but I can confirm that the backup feature works as advertised. If you’re using the new SAM unlock method, this is a must have.
You can download Cookie from the BigBoss repo, in Cydia, for free.
What do you think of Cookie?

How to restore your SAM unlock activation ticket to unlock your iPhone


Since it appears that Apple has fixed the issue with their activation servers,
latecomers to the SAM iPhone unlock party are left in the lurch. Fortunately, not all users have lost the potential to unlock their iPhones.
Those who were proactive enough to unlock their iPhone using SAM, and backed up their activation tickets can still easily restore those tickets and unlock their iPhones if they have to restore their device for whatever reason.
If you’re currently unlocked on an unofficial SIM by means of the SAM unlock, backup your activation ticket now before you lose it. We can’t stress this enough.
Keep in mind that you will still need a jailbroken iPhone to accomplish this, and you will need your backed up Lockdown folder that you saved-off after successfully unlocking your device the first go-round…
If you meet the criteria, step right inside and take a look at our easy to follow guide for restoring your iPhone unlock…
Note: This tutorial assumes your have your backed up Lockdown folder available on DropBox. If not, you can do so by other means, but DropBox is one of the easiest methods for accomplishing this.
Step 1: Insert the unofficial SIM card for which you created a backup activation ticket.
Step 2: Open iFile and navigate to /var/root/Library. Tap edit in the upper right-hand corner, and select Lockdown, and tap the zip button to create a backup of the current Lockdown folder. Name it something unique and distinguishable. Scroll to the bottom to ensure that a backup zip file was created. Now delete the Lockdown folder using the trash can icon.
Step 3: Open DropBox, find your backed up Lockdown folder with the valid activation ticket from your unofficial SIM card. Open the zip file with iFile, and select Unarchiver. This will unzip the Lockdown folder to your default landing directory which is usually the Documents folder.
Step 4: Tap edit in the upper right-hand corner, select LockDown and tap the clipboard icon below to copy the LockDown folder. Tap done.
Step 5: Navigate to /var/root/Library, and tap edit in the upper right-hand corner, tap the clipboard icon, and select paste. Tap done.
Step 6: If you still have SAMPrefs installed, Navigate to /User/Library/Preferences and search for SAM. Delete the com.bingner.sam.plist file if it exists. This will ensure that no SAM settings you have enabled will cause any unnecessary conflicts.
Step 7: Power down your iPhone completely.
Step 8: Power up the iPhone, and wait for a minute once it arrives at the Home screen. Your carrier should now reflect the carrier of the unofficial SIM card that you have inserted in your iPhone.
It seems like a lot of steps, but it can be done in less than 5 minutes. You probably won’t need to use this yet, unless you need to restore your device.
Let me know what you think in the comments below.
It looks like the SAM iPhone unlock no longer works


Many readers are reporting that — as suggested last night — Apple has fixed
its issue with its activation server that the SAM unlock method relied on.
I’ve tested the tried and true unlock method that I posted yesterday, and indeed, it’s not working for me either.
For those that did successfully use the SAM tool to unlock your iPhone before today, congratulations. Now we just hope that you are proactive enough to backup your activation ticket either manually, or via RedSn0w…
We won’t declare the SAM unlock 100% dead since there’s still no official word from the iPhone Dev Team or others intimately involved with the project, but judging from the comments on our YouTube channel, the comments on the unlock post, my own attempts to unlock, and various comments around the web, it’s pretty clear that the unlock is no longer working as it once did.
The good news is that if you did backup your activation ticket after a successful unlock, you can still unlock your iPhone if jailbroken, even if you restore your iPhone. Stay tuned for our follow up post that shows you how to restore your SAM unlock activation ticket on a jailbroken iPhone.
What has your experience then thus far? Were you able to get in before it was too late?

Rabu, 25 April 2012

How to reliably unlock your iPhone with the updated SAM tool


If you haven’t had much success unlocking your iPhone with the SAM tool,
then perhaps this will be of interest to you.
The developer of the SAM tool has updated it to make unlocking much easier than before. In fact, it only takes a few steps in most cases.
You don’t need iTunes, you don’t need the original SIM that you device is locked to, SIM ID’s, or anything like that.
Step 1: Install SAM via Cydia. Repo address: http://repo.bingner.com
Step 2: Insert your unofficial SIM card.
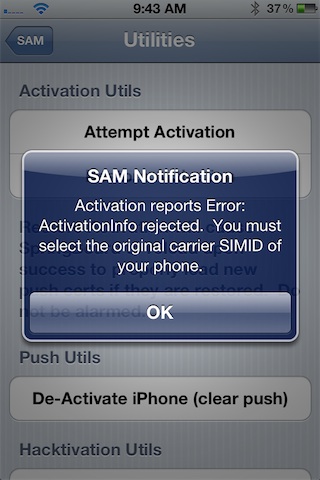
Step 3: Open SAMprefs, Go to Utilities and tap Attempt Activation.
Step 4: Your device will respring, and it should recognize your unofficial SIM card. If this doesn’t work, follow the full tutorial outlined below, and in the video.

Troubleshooting:

If you receive a message that says: You must select the original carrier SIMID of your iPhone, or any other error message, simply perform the following:
Step 1: Remove your SIM card
Step 2: Open iFile and go to /var/root/Library. Tap edit in the upper right-hand corner, and select Lockdown, and tap the zip button to create a backup of Lockdown. Scroll to the bottom to ensure that a backup zip was created. Now delete the Lockdown folder.
Step 3: Navigate to /User/Library/Preferences and search for SAM. Delete the com.bingner.sam.plist file.
Step 4: Power down your iPhone completely, and turn it back on.
Step 5: Insert your unofficial SIM card.
Step 6: Open SAMprefs go to Utilities and tap Attempt Activation. You will receive a dialogue stating that it may take a while. Your iPhone will respring.
Step 7: You should now be on your unofficial network. i.e. T-Mobile, etc.
Be sure to follow these steps exactly in order for it to work. I’ve tried this nearly a dozen times, and it always worked for me.
Let me know what you experience in the comments below!
Thx DinoD7 for the Video


Selasa, 24 April 2012

How to backup your iPhone’s unlock activation ticket with RedSn0w


Backing up your iPhone’s activation ticket was a step suggested by iPhone Dev
Team member MuscleNerd. Fortunately for us, his team has made it even easier to perform such a backup using the latest version of RedSn0w.
This step is suggested for those who take part in the recently uncovered SAM iPhone unlock method. If you followed our tutorial to unlock your phone, we suggest you follow through on preserving your activation ticket as well.
Check inside for a full video tutorial that shows how easy it is to successfully backup your iPhone’s unlock activation ticket, and any other file that you want to save locally from your iPhone…
Note: Your iPhone must be jailbroken to follow this step and have afc2 installed (most jailbreaks like RedSn0w and Corona include this by default).
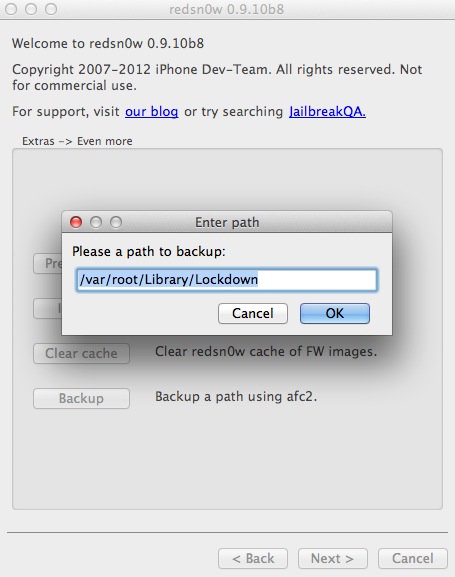
Step 1: Open RedSn0w 0.9.10b8 and click Extras > Even more > Backup
Step 2: Leave the default directory in the “Please a path to backup” field, and click Ok.
Step 3: RedSn0w will save off a timestamped zip file of your /var/root/Library/Lockdown directory to the same location where RedSn0w is installed on your computer.
This feature is mainly aimed at saving off the necessary files from this directory, but there is nothing stopping you from using it to backup other files as well.